
A FREE BOOKING appointment schedule system with APP
Get A free Book Appointment System
The Book Appointment System allows you to quickly add a simple and powerful appointment booking system to your application. The application owner can create multiple stores, categories, services and suppliers with the categorization of the type of service or class of delivery. You can easily manage or define store opening and closing hours with updates of specific changes to service provider hours.
Appointment Pro's booking engine sends automatic reminders for every appointment. The default reminder is set 1 hour before the appointment, but can be customized by the end user to meet individual needs.
The Book Appointment is also linked to the progressive loyalty card for seamless loyalty point conversion. Loyalty points can be accumulated automatically with each reservation made. Please note that the progressive loyalty card module must be installed and configured correctly before assigning loyalty points for any successful service or lesson delivery.
The Book Appointment module comes with an advanced branch payment method function to manage the payment of your choice, you can manage your payment centrally, semi-centrally and separately (in terms of taxes) with all controls at your fingertips , saving payment gateway fees for transfers and transactions.
In the series of innovations and meeting the requirements of the new age, we introduce the distance indication function that shows how far your company locations are from the current end-user location. To activate the Distance Indication feature, you must enter your JavaScript API key correctly in the Google Maps API Keys configuration fields.
Menu> Settings> API Keys> Google Maps Settings
We are introducing another unique feature especially for business owners, sometimes while users pay through various payment methods that are charged on an accrual basis and if the consumer cancels the reservation, the business owners have to bear all the losses. To protect these losses, we have added a new 'Cancellation' feature. This feature allows you to charge cancellation fees on canceling reservations you create on a percentage basis.
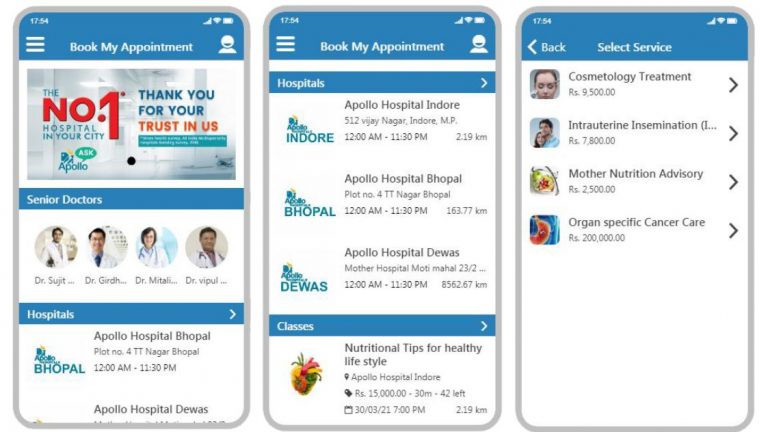
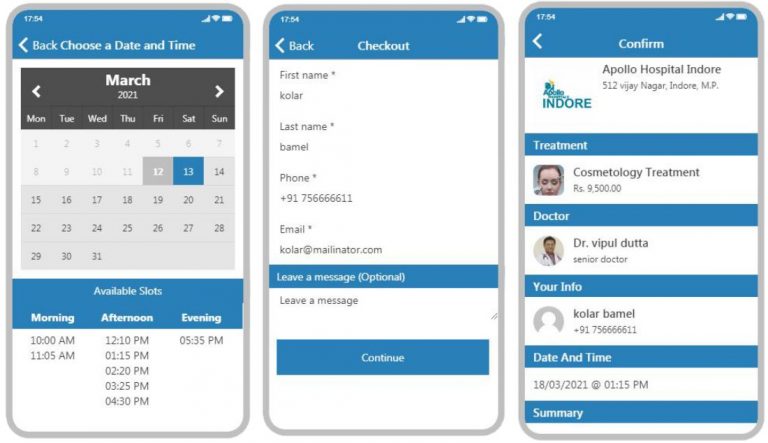
Mobile App Screenshots:
Settings Tab
Through the Settings tab, you can easily manage all your Booking, Payment, Date & Time, Cancellation, Notification, and Currency settings
Home Screen
![]()
Appointment Pro Part 1 Home Screen Settings
From the Home screen section, you can manage the Slider, Popular Provider, List Design, Location sorting.

1) By Check/Uncheck on Enable Slider check box you can enable or disable the slider from App’s home screen.
2) By Check/Uncheck on Enable Popular Provider check box you can enable or disable to display the provider from App’s home screen.
3) By Check/Uncheck on Enable Top Category check box you can enable or disable to display the Categories from App’s home screen.
4) By List Design you can change the view of your app according to list or card style.
5) Through Default location sorting you can sort the branches according to distance from end-user’s current position, Alphabetical (Alpha) other according to branch name wise and according to created date wise by selecting any of the sorting types from drop-down list.
Booking Settings
![]()
Appointment Pro Part 2 Booking Settings
With the help of the Booking section, you can manage Admin’s Email, Booking Type, Booking, Auto Accepted Bookings.
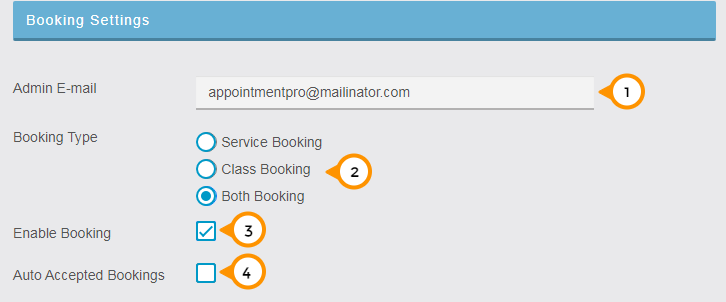
1) From here you can add or update the admin’s email address to get all the relevant updates and notifications.
2) From here you can select your booking type according to service categorization as service booking, class booking, and Both.
3) By Check/Uncheck on Enable Booking check box you can enable or disable booking in the app.
4) By Check/Uncheck on Auto Accepted Bookings check box you can enable or disable Auto bookings through this option user has no need to accept the individual bookings manually.
Payment Setting
![]()
Appointment Pro Part 3 Payment Settings
Under the payment setting section, you can manage all payment-related options like Price Hide, Online Payment, Offline Payment, Display Tax, Tax Percentage, PLC points.
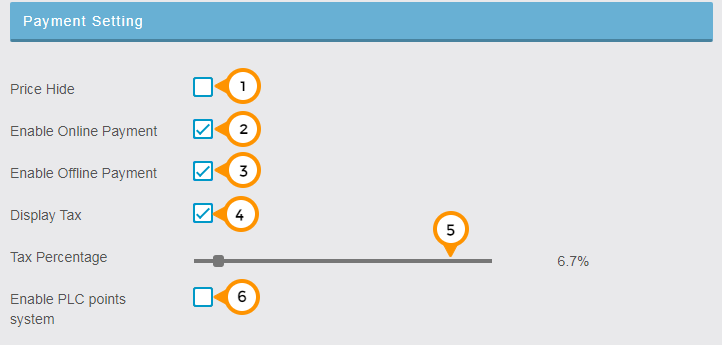
1) By Check/Uncheck on Price Hide check box you can show or Hide the services’ price from the app.
2) By Check/Uncheck on Enable Online Payment check box you can enable or disable online payment options from the app during service booking.
3) By Check/Uncheck on Enable Offline Payment check box you can enable or disable offline payment options from the app during service booking.
4) By Check/Uncheck on Display Tax check box you can show or Hide Tax charges from the app.
5) By dragging the tax percentage bar you can change the applicable percentage of tax on the services you can also set the tax percentage by using navigation keys of your keyboard just click on the bar point and press UP/DOWN (or) LEFT/RIGHT keys to increasing and decreasing the percentage value.
6) By Check/Uncheck on Enable PLC points system you can enable or disable the features of the Progressive Loyalty Card module.
Date, Time Format, and Distance Setting
![]()
Appointment Pro Part 4 Date, Time Format, and Distance Setting
Via Date, Time Format, and Distance Setting you can manage Time & Date Formats, and Distance Unit.
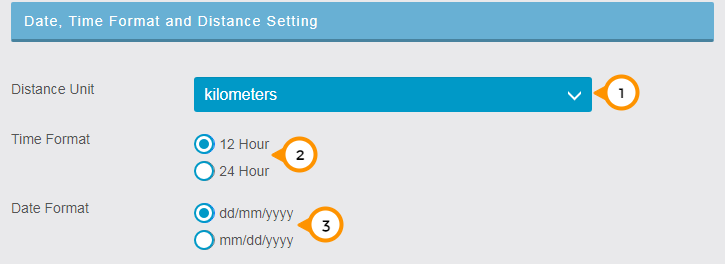
1) By Click on Drop and Down menu you can change the distance display format in the app.
2) By Click on bullet buttons you can change the Time display format in the app.
3) By Click on the bullet button you can change the Date display format in the app.
Cancellation Setting
![]()
Appointment Pro part 5 Cancellation Setting
Via the Cancellation setting, you can manage the Criteria, Charges, and Cancellation Policy of your offering services and classes.
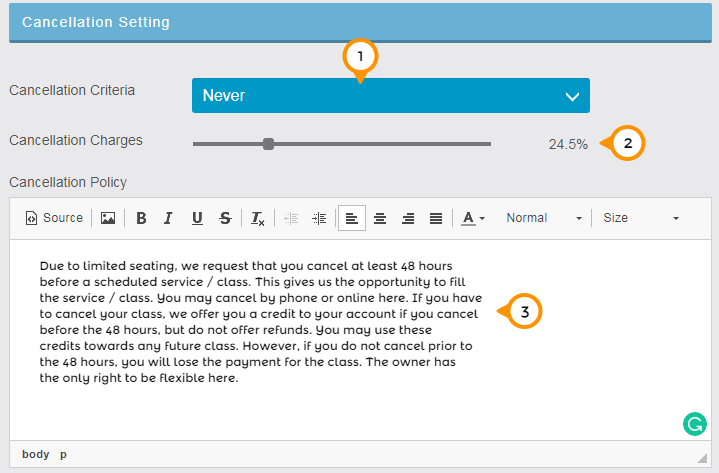
1) By Click on the drop-down menu you can select the cancellation criteria according to you from the available options. i.e. Never, Always, Hour/s before, the day before, and the week before.
2) By dragging the cancellation charges percentage bar you can change the applicable percentage of cancellation charges on the services and classes you can also set the percentage of cancellation charges by using the navigation keys of your keyboard just click on the bar point and press UP/DOWN (or) LEFT/RIGHT keys to increasing and decreasing the percentage value.
3) Under the Cancellation Policy field area you can mention your terms and conditions about the cancellation of booked services and classes. You can beautify the message by adding images, formatting the texts by aligning, bold, underline, etc.
Currency Options
![]()
Appointment Pro Part 6 Currency options
Via currency options, you can manage the position, Decimal separator, Thousand separator, and Number of decimals to display according to trends and practices as per your belonging regions.
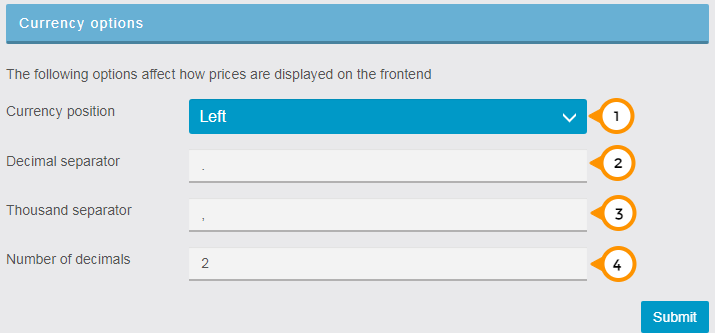
1) By click on the drop-down menu you can change the position of the currency’s symbol with respect to the amount.
2) From here you can enter and change the decimal separator symbol according to you to display in the app.
3) From here you can enter and change the thousand separator symbol on the price of services and classes as per your requirement to display in the app.
4) From here you can change the format of showing the price in the app as per your requirement to show the number of digits after decimal value.
Payment Method
![]()
Appointment Pro Part 7 Payment Gateways
Through the Payment Method tab, you can manage and set up your payment gateways.

By click on the edit icon, you can manage or set up a fresh PayPal payment system.
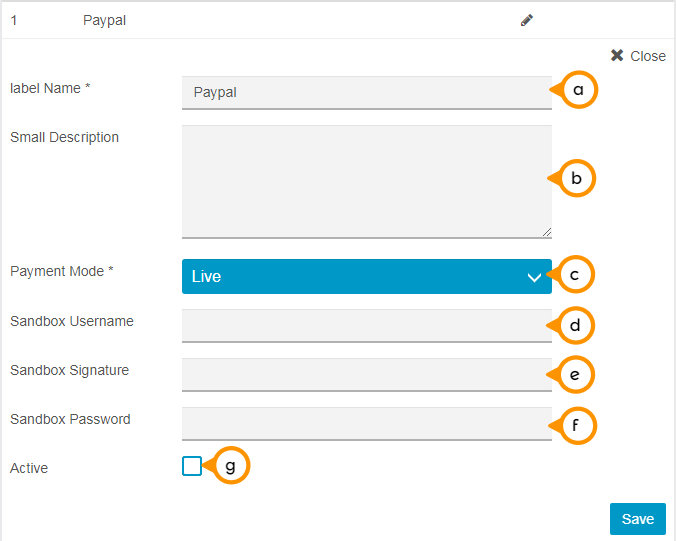
a) From here you can change the label name of Paypal gateway according to your choice.
b) Here you can mention the small description about transaction condition, offers, instructions, etc.
c) By click on the drop-down menu you can change the payment modes of the Paypal gateway
d) Here you need to enter the Username of your Paypal active account.
e) Here you need to mention the Signature values of your Paypal active account.
f) Here you need to enter the password of your account to connect to the Paypal gateway.
g) By Check/Uncheck on the ‘Active’ check box you can enable or disable the Paypal gateway from the app’s payment option.
Stripe
By click on the edit icon you can manage or set up a fresh Stripe payment gateway system.
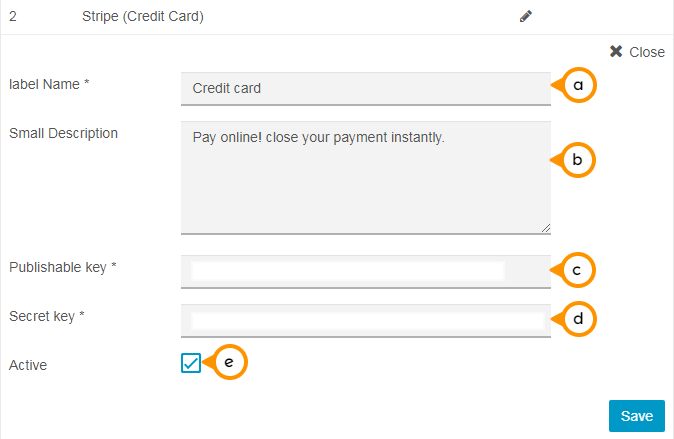
a) From here you can change the label name of Stripe gateway according to your choice.
b) Here you can mention the small description of transaction conditions, offers, instructions, etc. related to your payment gateway.
c) Here you need to enter the Publishable Key of your Stripe active account.
d) Here you need to enter the Secret Key of your Stripe active account.
e) By Check/Uncheck on the ‘Active’ check box you can enable or disable the Stripe gateway from the app’s payment option.
Cash
By click on the edit icon, you can manage the cash payment.
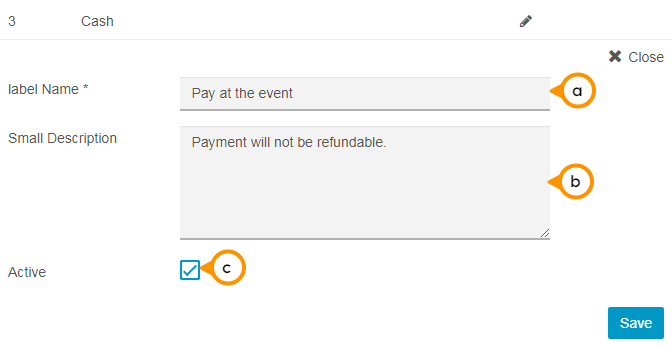
a) From here you can change the label name of Cash Mode of payment.
b) Here you can mention the small description about offers, instructions, etc.
c) By Check/Uncheck on the ‘Active’ check box you can enable or disable the cash mode of payment from the app’s payment option.
Sliders Tab
![]()
Appointment Pro Part 8 Slider, Manage slider
From here you can add the sliders and manage to the existing sliders from here.
By click on a Plus icon, you will able to add a new slider to your app.
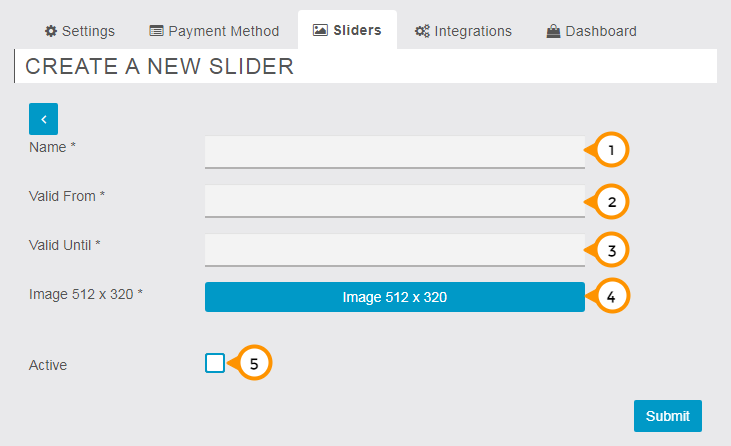
1) Here you need to enter the name of the slider.
2) Here you need to mention the start date of the slider to be displayed.
3) Here you need to mention the Last date of the slider to stop being display.
4) By click on the Image button you can upload the slider image the image size should be 512X320 Pixels.
5) By Check/Uncheck on the ‘Active’ check box you can enable or disable the slider from the app’s home page.
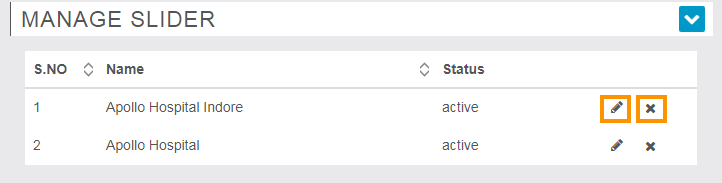
From this section, you can manage all the existing sliders in the app here by click on the edit button, and by click on the cross button, you can be removed to existing sliders from the app.
Integrations
![]()
Appointment Pro Part 9 Integrations
From here you can get web URL and embed code to user your application where ever you want.
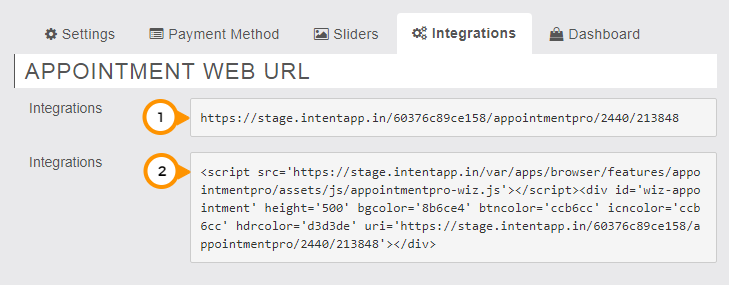
1) From here you can get the direct access URL of your application.
2) Here you get the readymade embedded code, you just need to copy and paste the code to show the application’s contents where ever you want. i.e. HTML pages, apps, etc.
Manage Labels
![]()
Appointment Pro Part 10 Manage Labels
From here you can change the labels name according to your requirements. Suppose if you have a salon business according to the business Provider = Hair artist, Location = Parlor or salon, services = products, and Category = Package, etc.
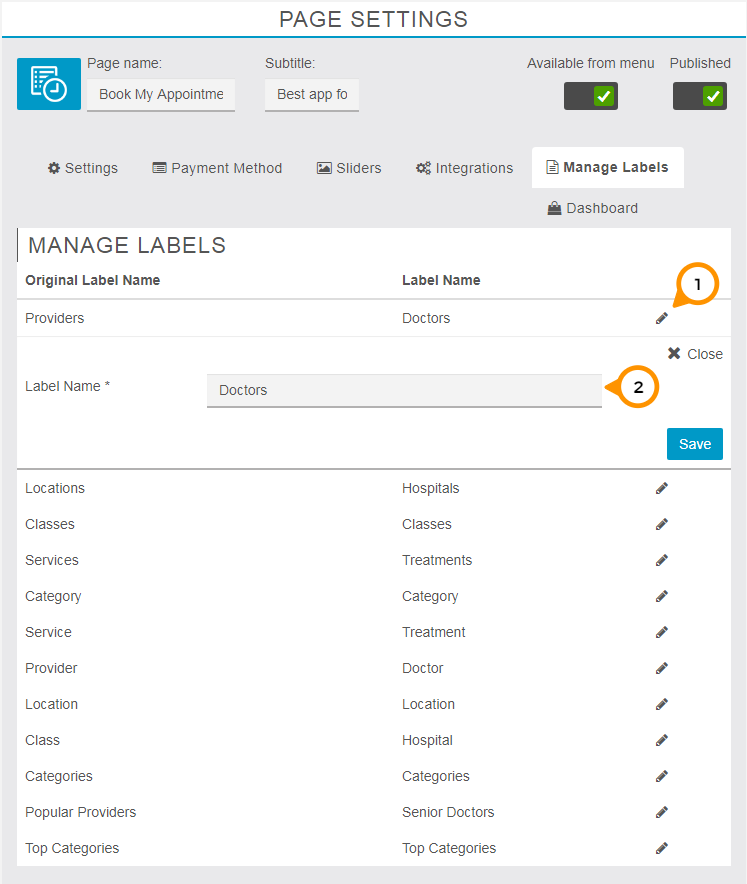
1) By click on edit icon you can change the default labels name.
2) Here you need to enter the new label name as per your requirements then click on the save button then apply the changes.
Dashboard
Through the dashboard you can manage the complete requirements of the appointment system like Creating and managing the locations, creating and managing categories, adding and managing services, adding and managing classes, adding providers and manage them, managing all types of bookings, Calendar to notify the booking date wise, and Reports to analyzing fund collection through bookings.
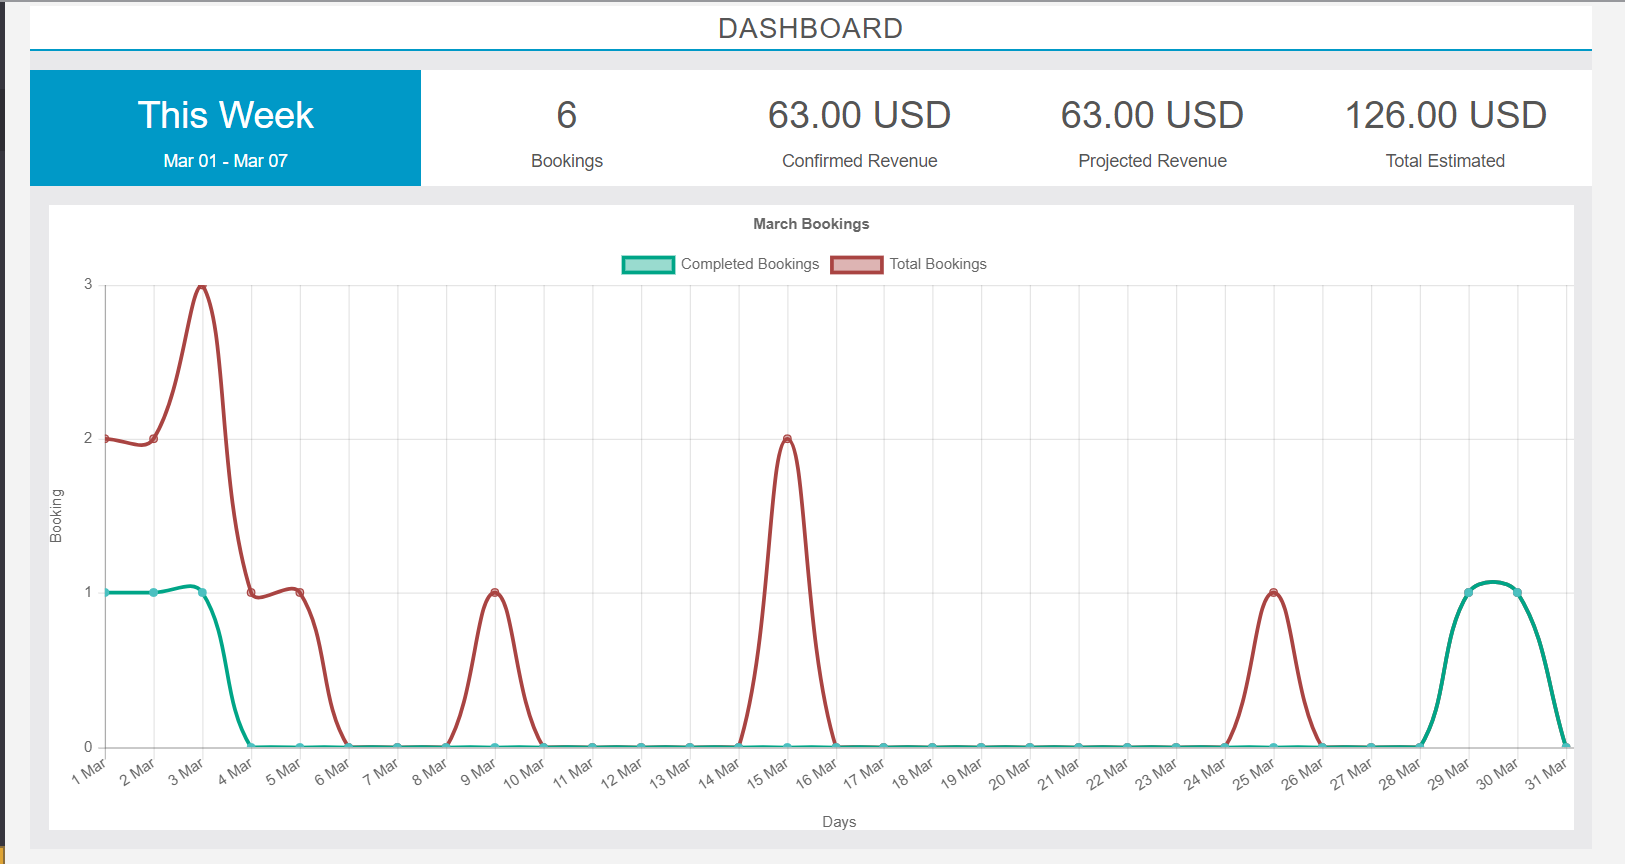
By default you get the information of current week revenue estimation from Monday to Sunday in increasing order as showing on the above image you get the info about total successful bookings, confirmed revenue of the week till the date, projected revenue which means the forecasted value of revenue which may be changed according to the successful completion of booking, Total estimated revenue.
Under the graphical analysis display area on the dashboard, you can identify the total bookings by red color line and completed bookings by green color lines. The analysis chart is showing data of a complete current month on the dashboard.
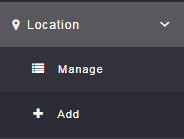
By Location tab, you can Manage the existing locations or Add the new locations.
Add Location
![]()
Appointment Pro Part 11 Add Locations
By click on add location, you can able to add new locations of your business for delivering the services and classes to the clients from various locations.
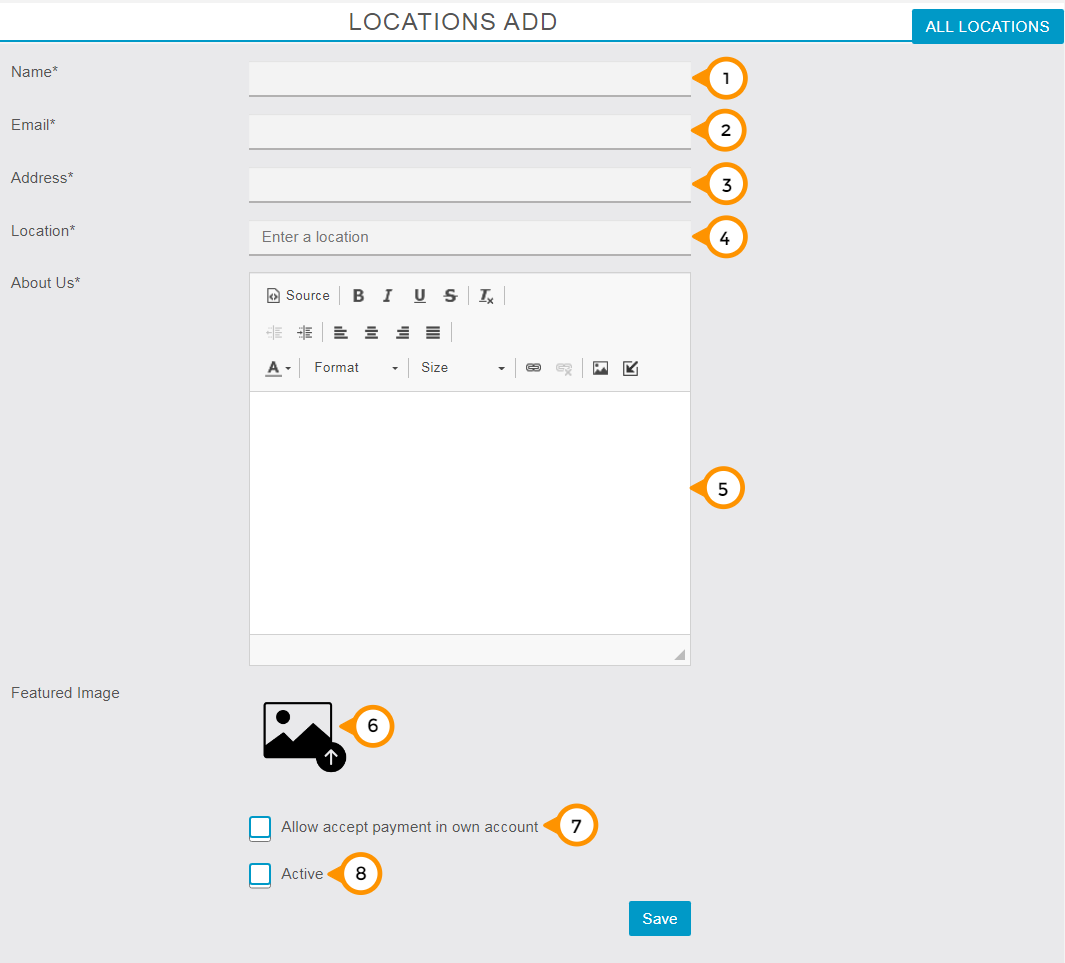
1) You need to enter your location name here.
2) you need to enter the email address of the store or branch manager to get the updates via email.
3) You need to enter the address of your location here so that your client will reach your location.
4) You need to enter or select the suggested Geolocation of your branch to show the accurate distance from the app user.
5) You Need to share a small brief about the business and services you are offering.
6) Here you can upload the featured image of your location.
7) By doing a checkmark here you can enable the accept payment location-wise means the customer will able to pay directly to the branch’s account instead of the admin’s account.
Note: if you are not set up any payment settings on a particular location and simply check-marked here and allow accept payment in own (location) account. In that case, while the customer tries to do booking it will not work due to lack of payment settings the message will show no payment gateway is available.
8) By check / uncheck on an active check box you can enable or disable the location in the App.
Category
![]()
Appointment Pro Part 12 Add Category & Service
By category tab, you can manage the exiting category or add the new category.
From here you can add the new category of your services and classes in the app.
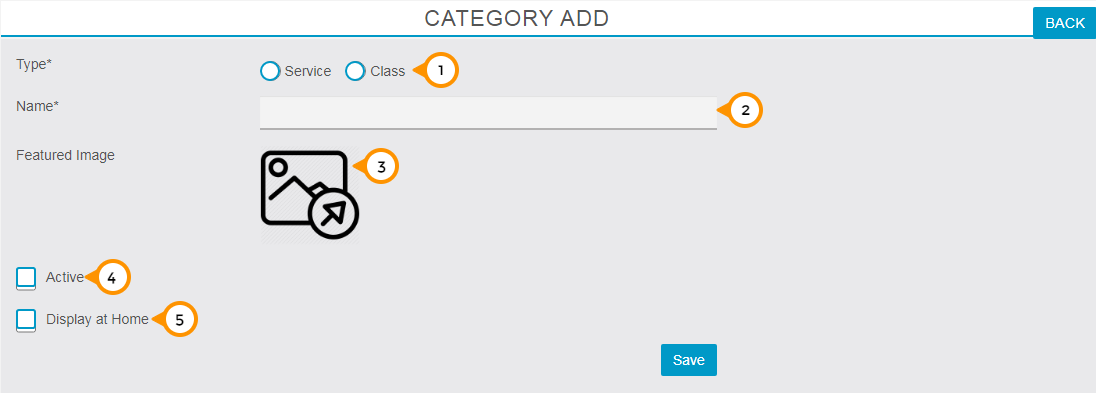
1) Here you need to select the nature of your delivery type like: Service or Class
2) Here you need to enter the name of your category. i.e. food, electronics, automobile, furniture, etc.
3) Here you can upload the feature image of your category.
4) By Check/Uncheck on the ‘Active’ check box you can enable or disable the particular category in the app.
5) By Check/Uncheck on the ‘Display at Home’ check box you can enable or disable to display the particular category on app’s home screen.
Service
![]()
Appointment Pro Part 12 Add Category & Service
By service tab, you can manage the exiting services or add the new services.
Add Services
From here you can add the new services of your business.
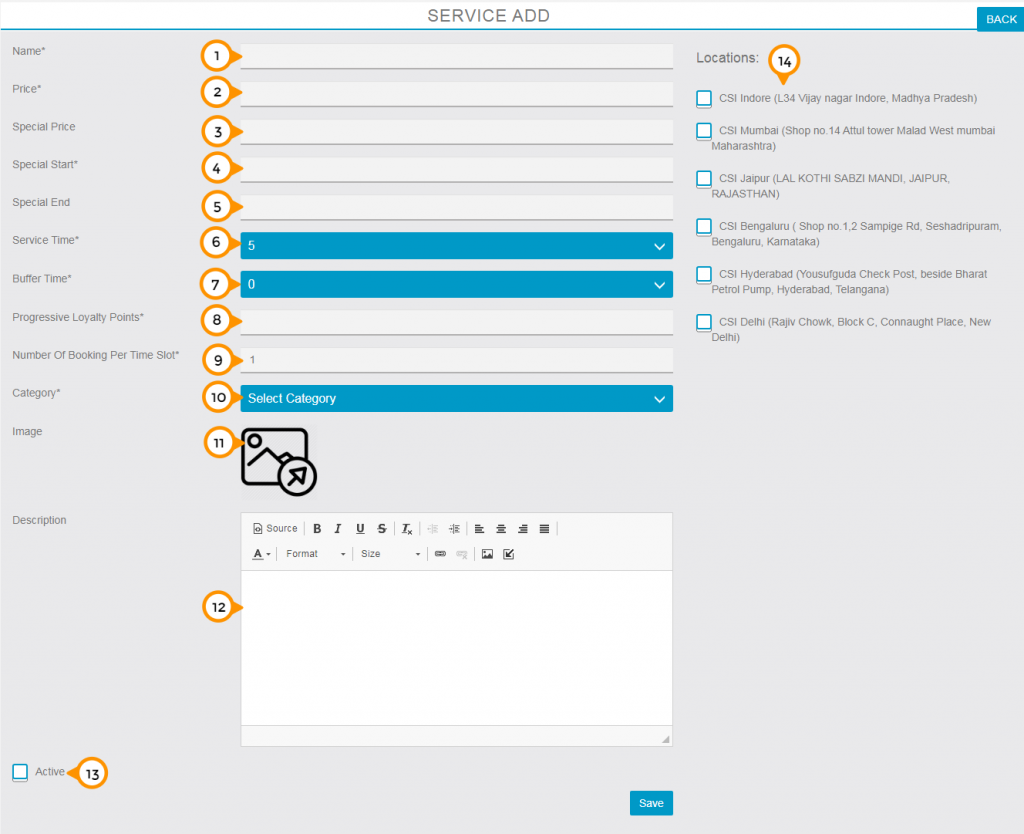
1) Here you need to enter the name of your service.
2) Here you need to enter the price of your service as per single delivery to the client.
3) Here you can mention the special price for the offer.
4) Here you can mention the start date of your service offer period.
5) Here you can mention the end date of your service offer period.
6) Here you need to mention the service time according to per service delivery basis.
7) Here you need to mention the buffer time which you will require to prepare for the next appointment.
8) Here you need to mention the progressive loyalty points you want to transfer on each successful service delivery.
9) By default, it’s set a one but you can change the Number Of Booking Per Time Slot as per your requirements which allows you to have multiple people book during the same available time slot.
10) Here you need to select the category of your service from the drop-down menu.
11) Here you can upload the image of your service.
12) Here you can mention the small brief about your service.
13) By Check/Uncheck on the ‘Active’ check box you can enable or disable the particular service in the app.
14) By Check/Uncheck on available “Location’s” checkboxes you can enable or disable the service on the particular locations.
Classes
![]()
Appointment Pro Part 14 Add Class
By classes tab you can manage the exiting classes or add the new classes.
Add Classes
From here you can add the new Classes of your business.
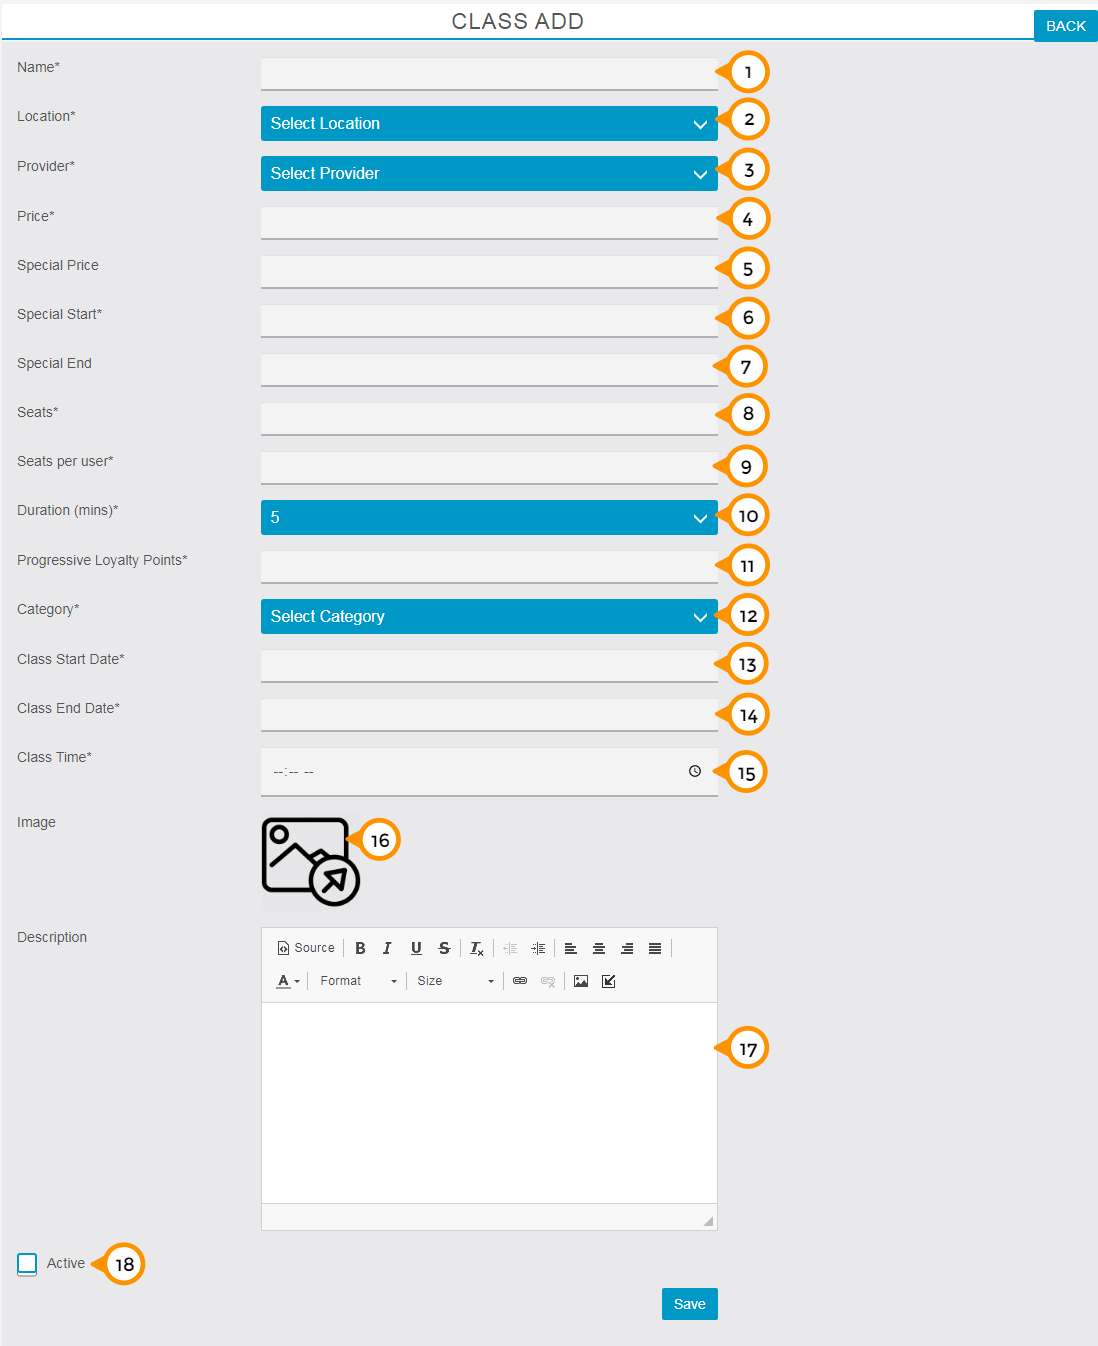
1) Here you need to enter your class name.
2) Here you need to select your location for class delivery from the drop-down menu.
3) Here you need to select the provider for class from the drop down menu.
4) Here you need to enter the price of the complete class or complete course of the class.
5) Here you can mention the special price for the offer.
6) Here you can mention the start date of your class offer period.
7) Here you can mention the end date of your class offer period.
8) Here you need to declare the available seats for class.
9) Here you need to mention seats per user means how many seats you want to sell at a time.
10) Here you need to mention the class duration for each session.
11) Here you need to mention the progressive loyalty points you want to transfer on each successful service delivery.
12) Here you need to select the category of your class.
13) Here you need to mention the date on which you going start to deliver the class.
14) Here you need to mention the date on which class will end.
15) Here you need to mention the daily class time on a particular location.
16) From here you can upload the image of the class.
17) Here you can share the details and course contents of the class.
18) By Check/Uncheck on the ‘Active’ check box you can enable or disable the particular class in the app.
Providers
![]()
Appointment Pro Part 13 Add Provider
By the provider tab, you can manage the exiting providers or add the new provider.
Add Provider
From here you can add the new provider of your business.
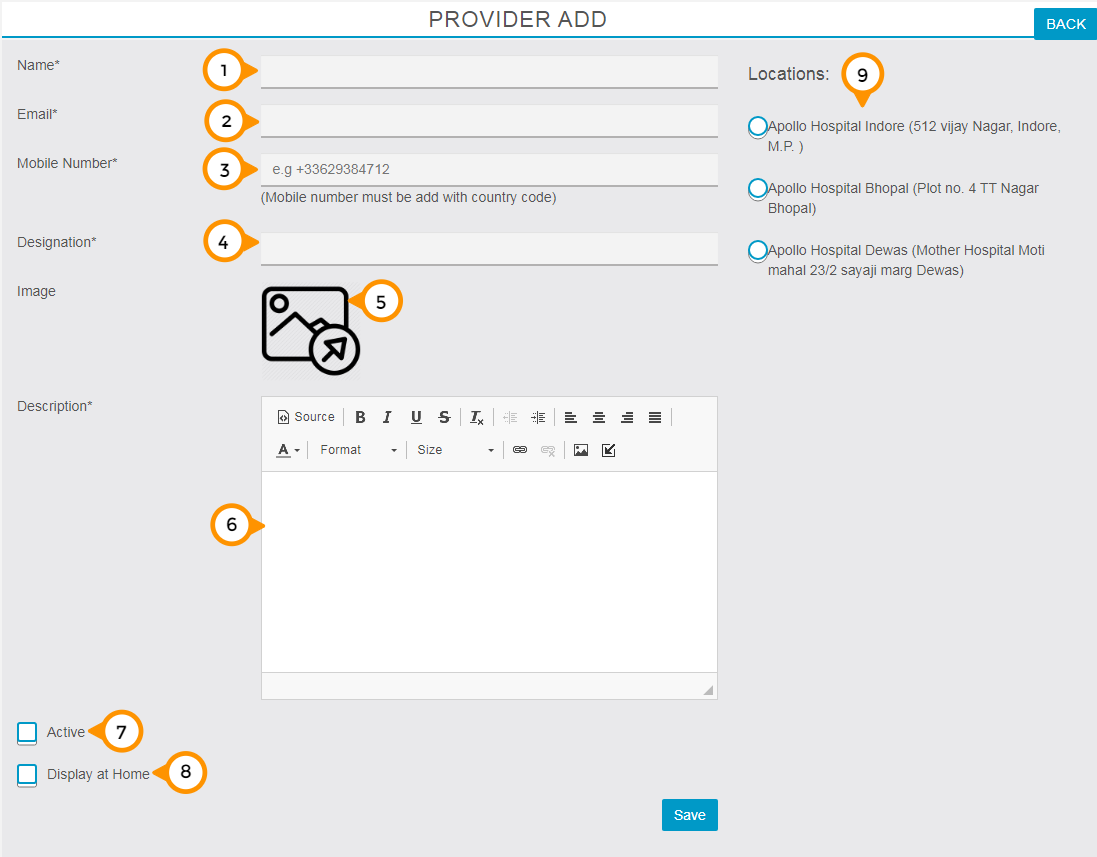
1) Here you need to enter the name of the provider.
2) Here you need to enter the email of the provider to get updates via email.
3) Here you need to enter the mobile number with country code of the provider.
4) Here you need to mention the designation of provider.
5) By click on image icon you can upload the profile image of the provider.
6) Here you need to mention the short information about provider.
7) By Check/Uncheck on ‘Active’ check box you can enable or disable the provider in the app.
8) By Check/Uncheck on ‘Display at Home’ check box you can enable or disable to display the particular provider on app’s home screen.
9) By click on bullet button you can assign any of the location to the provider.
Bookings
By Bookings tab you can manage all the bookings (Today / Upcoming / All) and able the add new bookings from dashboard too.
Today
From here you can able to see and manage today’s appointment for ease to handle deliveries of the day.
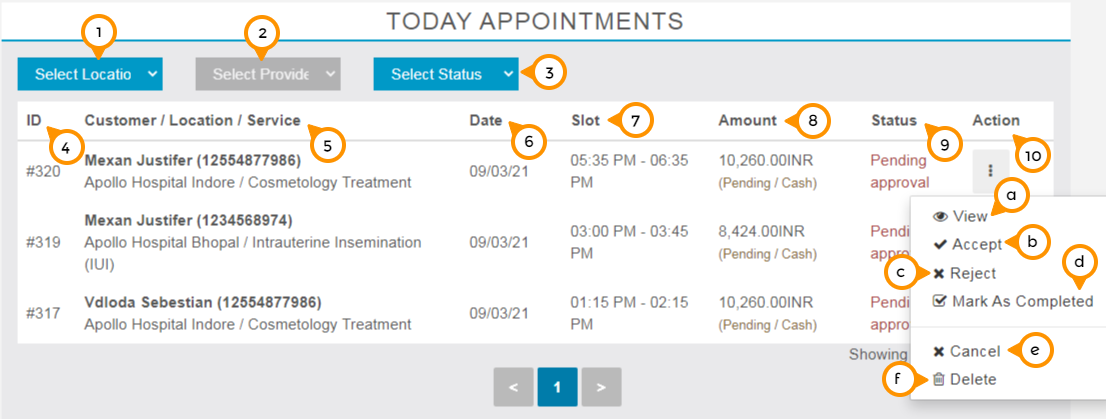
1) From here you can apply the filter by location by selecting the location from the drop-down menu.
2) From here you can apply the filter by providers by selecting the provider from the drop-down menu.
3) From here you can apply the filter on the basis of appointment status like: Accepted, Pending, Completed, Rejected, etc. by selecting the status from the drop-down menu.
4) From the ID column you can get the unique identification number of the appointment.
5) From here you can get the details about the Customer’s name, Location of appointment, and service taken by the customer.
6) Here you can get the date of the appointment (current date).
7) From the slot column you can get the details about the slot timing of the booking.
8) Here you can get the details about the receivable amount of the particular booking.
9) From the status column you can get the current status of the booking.
10) By click on the three dots setting tab you can manage the booking completely.
a) View: By click on ‘view’ under the setting menu you can able to view the complete details of the appointment. i.e. Booking, Payment, Customer, and service.
b) Accept: By Click on ‘Accept’ under the setting menu you will accept the booking and prepared for delivery.
c) Reject: By Click on ‘Reject’ under the setting menu you will deny accepting the booking or in the case booking requests are not matched at the moment.
d) Mark as completed: By Click on ‘Mark as completed’ under the setting menu you will update the booking status as completed. Note: In the case of COD payment mode by default we treated payment received with completion of booking.
e) Cancel: By Click on ‘Cancel’ under the setting menu you will cancel the booking by your side. The user has the freedom to cancel the booking by his side too depends on your cancelation settings.
f) Delete: By Click on ‘Delete’ under the setting menu you will remove the booking from the platform.
Upcoming
From here you can able to see and manage all the upcoming appointments for ease to handle all upcoming deliveries.
all the elements of the upcoming section are the same as today’s section that we have seen above.
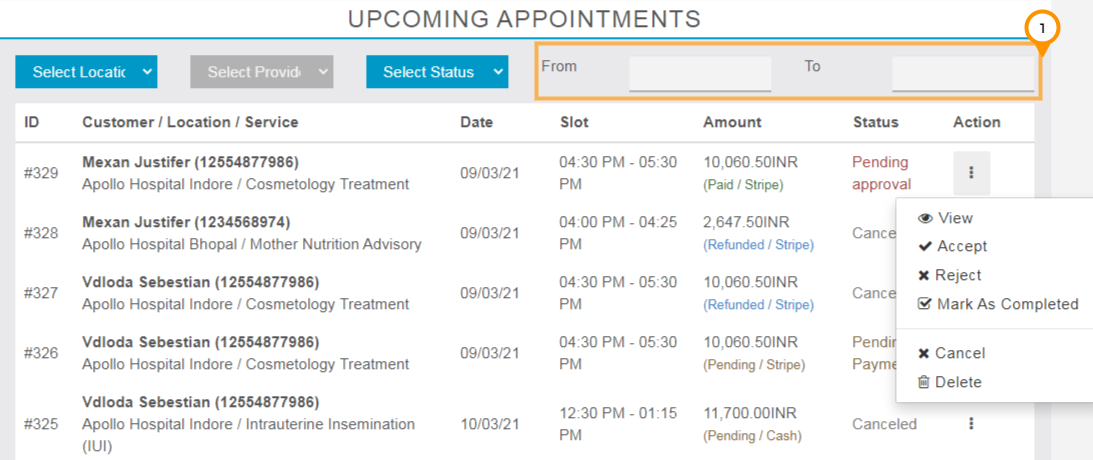
1) Here you can enter the date range according to your requirement and fetch the data accordingly.
From here you can able to see and manage all the bookings no matter here that the bookings are old or new.
All the elements of this section are the same as today’s section that we have seen earlier.
New Booking
From here you can generate the booking from the dashboard also for a client.
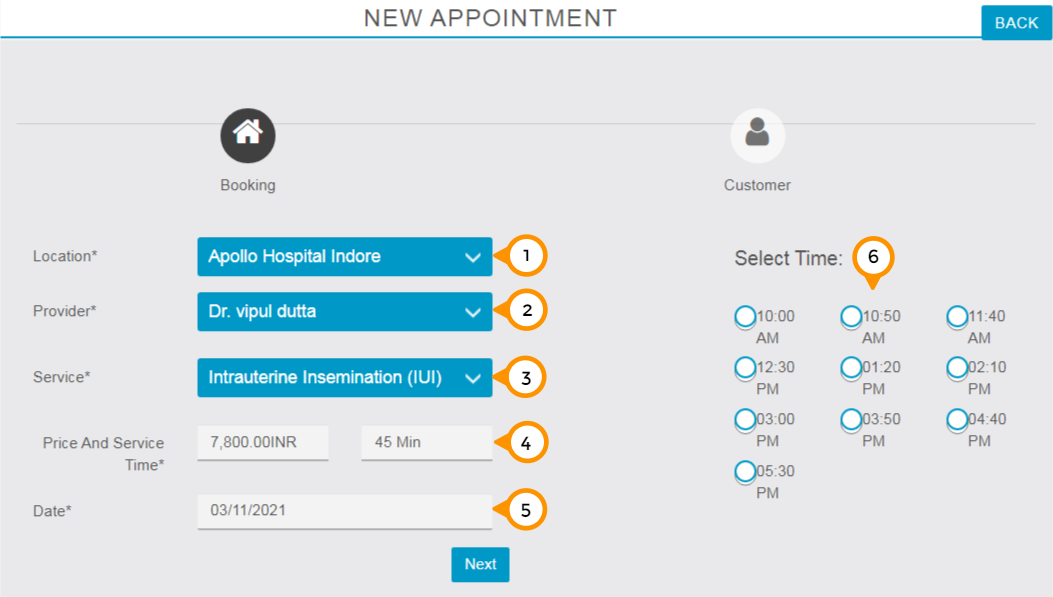
1) Here you need to select the location from the drop-down menu.
2) Here you need to select the provider from the drop-down menu.
3) Here you need to select the service.
4) Automatically Price and service time will be appeared at here.
5) By click here you can select the date of booking from the popup calendar.
6) By Click on the bullet button you can select any of the slot display.
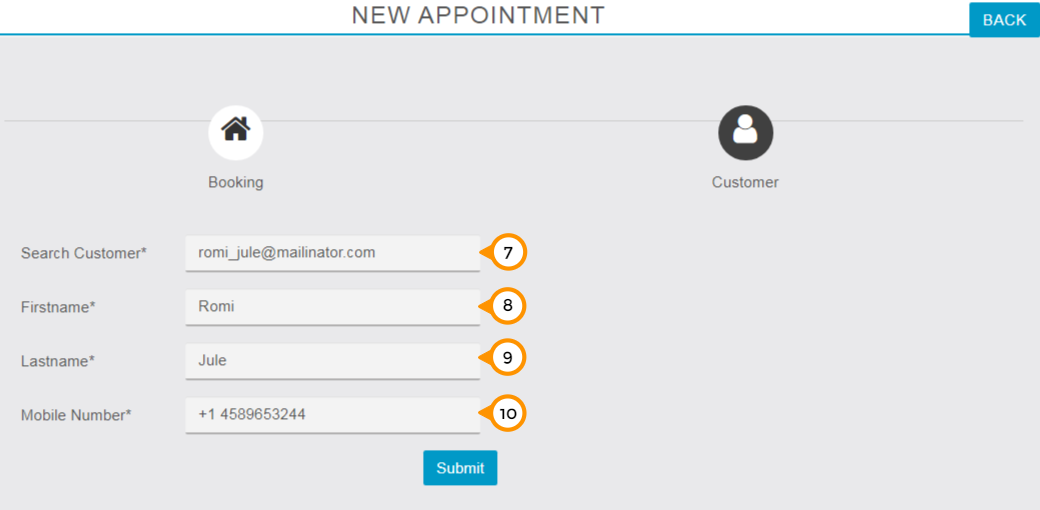
7) Here you need to enter the customer’s email ID.
8) Here you need to enter the first name of the customer.
9) Here you need to enter the Last name of the customer.
10) Here you need to enter the customer’s mobile number and click on the “submit” button to generate a booking.
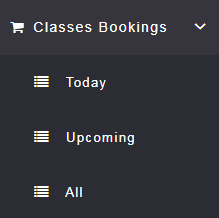
Classes Booking
By the Classes Booking tab, you can manage all the bookings (Today / Upcoming / All).
Today
From here you can able to see and manage today’s appointment for ease to handle a class of the day.

1) From here you can apply the filter by location by selecting the location from the drop-down menu.
2) From here you can apply the filter by class <Name> by selecting the class <Name> from the drop-down menu.
3) From here you can apply the filter on the basis of appointment status like Accepted, Pending, Rejected, etc. by selecting the status from the drop-down menu.
4) From the ID column you can get the unique identification number of the appointment.
5) From here you can get the details about the Customer’s name, Location of appointment and class taken by the customer.
6) Here you can get the class name of the booked appointment.
7) Here you can get the date of the appointment (current date).
8) Here you can get the details about the receivable amount of the particular booking.
9) From the status column you can get the current status of the booking.
10) By click on the three dots setting tab you can manage the booking completely.
a) View: By click on ‘view’ under the setting menu you can able to view the complete details of the appointment. i.e. Booking, Payment, Customer, and service (Class).
b) Accept: By Click on ‘Accept’ under the setting menu you will accept the booking and prepared for delivery.
c) Reject: By Click on ‘Reject’ under the setting menu you will deny accepting the booking or in the case booking requests are not matched at the moment.
d) Cancel: By Click on ‘Cancel’ under the setting menu you will cancel the booking by your side. The user has the freedom to cancel the booking by his side too depends on your cancelation settings.
e) Delete: By Click on ‘Delete’ under the setting menu you will remove the booking from the platform.
From here you can able to see and manage all the upcoming appointments for ease to handle all upcoming deliveries.
all the elements of the upcoming section are the same as today’s section that we have seen above.
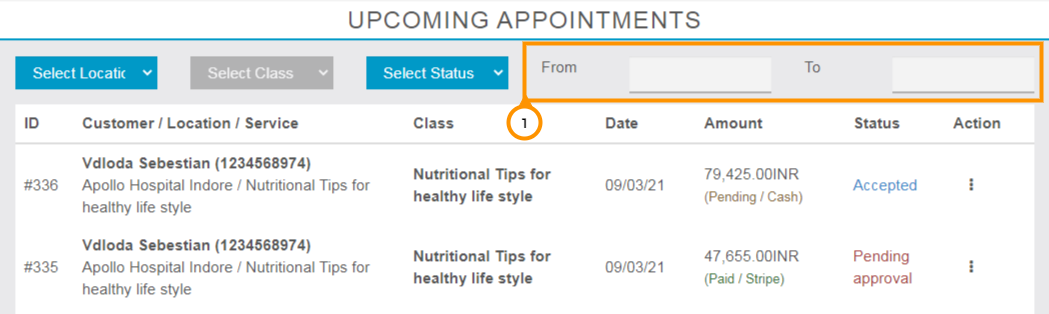
1) Here you can enter the date range according to your requirement and fetch the data accordingly.
From here you can able to see and manage all the bookings no mater here that the bookings are old or new.
All the elements of this section are the same as today’s section that we have seen earlier.

From here you can view entire bookings of your app from individuals and all the locations of your business. You can also manage the booking directly from here. You can View, Accept, Reject, Mark as Completed, Cancel, and Delete the booking.
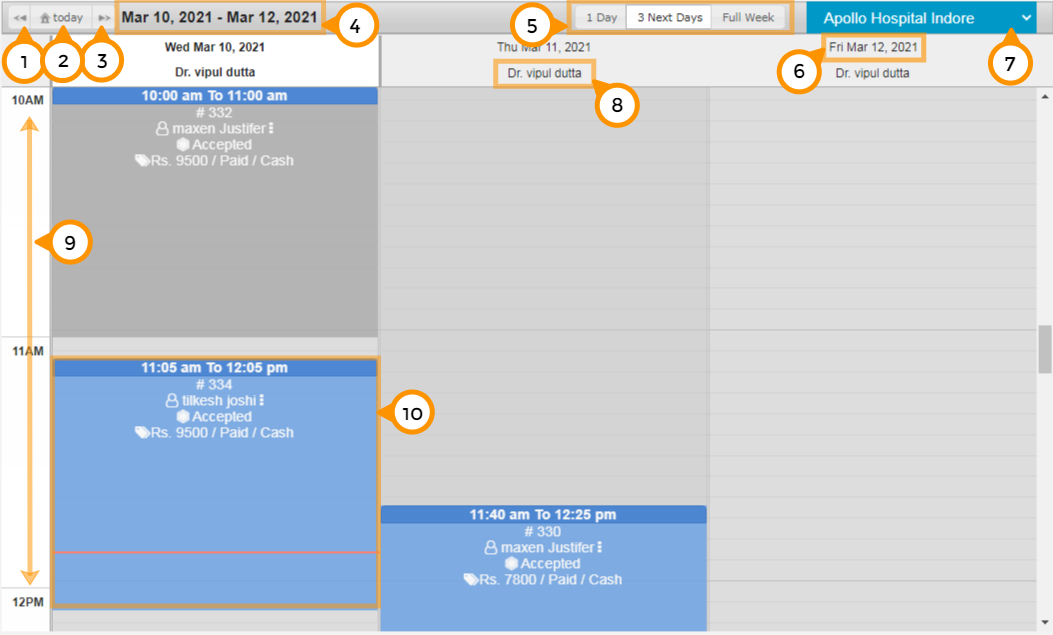
1) By Click on the ‘Previous’ button you can go to the back dates on the calendar.
2) By Click on the ‘Today’ button can again come back to the current date on calendar.
3) By Click on the ‘Next button you can go to the upcoming dates on the calendar.
4) From here you can see the range of showing dates.
5) From here you can select the range on the calendar. (Single Day / Three Days / Full Week)
6) Here you can see the date of the column.
7) Here you need to select the location to see the bookings.
8) Here you can see the provider of the column.
9) Here you can see the scale of time on calendar.
10) Here you can see the short info about booking on the calendar. By click on a particular booking area on the calendar, you can also manage the booking from here directly.

a) View: By click on ‘view’ under the setting menu you can able to view the complete details of the appointment. i.e. Booking, Payment, Customer, and service.
b) Accept: By Click on ‘Accept’ under setting menu you will accept the booking and prepared for delivery.
c) Reject: By Click on ‘Reject’ under the setting menu you will deny accepting the booking or in the case booking requests are not matched at the moment.
d) Mark as completed: By Click on ‘Mark as completed’ under the setting menu you will update the booking status as completed. Note: In case of COD payment mode by default we treated payment received with completion of booking.
e) Delete: By Click on ‘Delete’ under the setting menu you will remove the booking from the platform.
f) Cancel: By Click on ‘Cancel’ under the setting menu you will cancel the booking by your side. User has a freedom to cancel the booking by his side too depends on your cancelation settings.
![]()
From here you can trace the reports of all the bookings and their payment status.
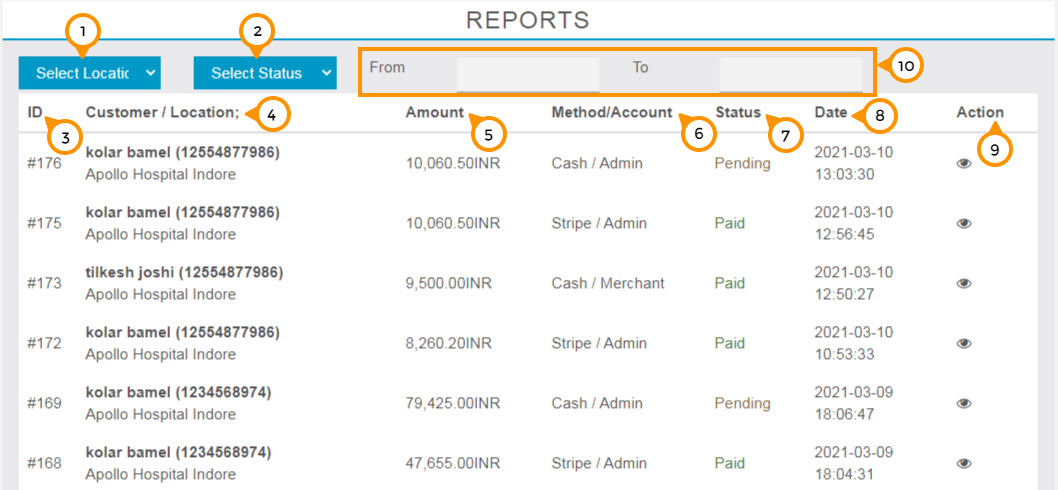
1) From here you can select the location of your business branch and get the details accordingly.
2) From here you can select the status from the drop-down menu and apply the filter according to the selected status.
3) From here you get the record’s ID.
4) From here you get the details about the customer name and location of appointment.
5) Here you get the total amount value of the service inclusive of applicable tax.
6) From here you get the information about the mode of payment receive and details of the account who will get the amount either Admin or Merchant (location wise).
7) Here you get to know about the payment status that amount has paid or pending of the booking.
8) From here you know the date of booking.
9) By click on the eye icon you will get the complete details of the appointment.
Miscellaneous
Reminder
a) Reminder for Admin: If a new booking is not accepted within 30 minutes Admin will get the reminder message on his register email after 30 minutes of the new booking received.
b) Reminder for Client: The first client will get the confirmation email of his recent booking, he will notify as his booking accepted by admin and get the reminder before the slot. The client has the freedom to set a reminder notification time according to his/her choice. Click on the profile icon then go to the settings tab then click on the Notification bar then select the Reminder Notification before time according to you.
By arrangement option, you can reorder the sequence or arrange the display positions of categories and providers on the home screen of the app according to you.
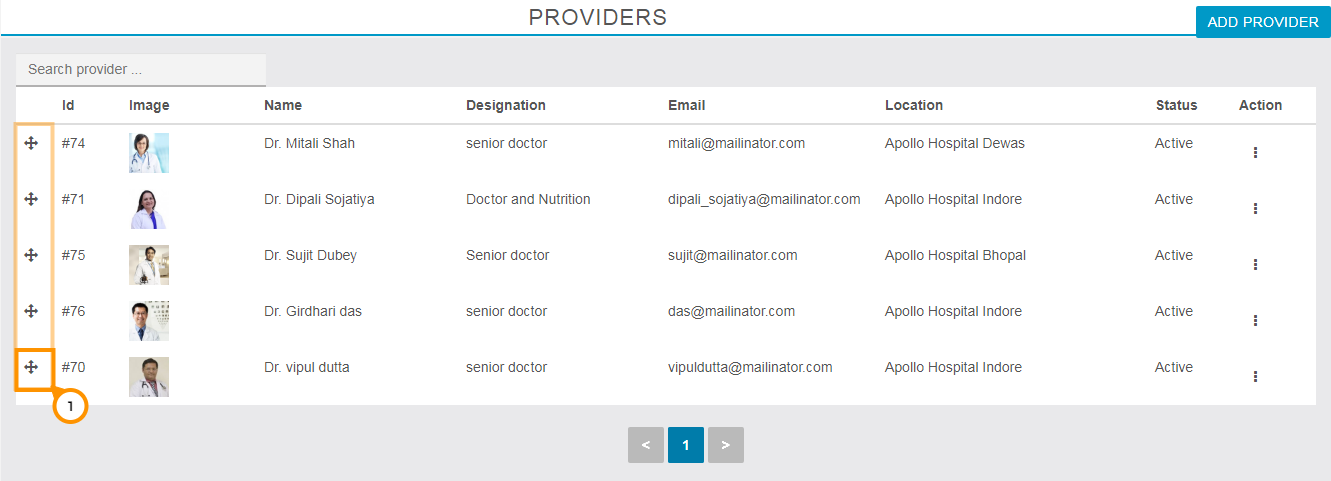
1) By hold and drag of the moving icon you can arrange the order and positions of the items.